Contact Mike or Nicole and give them words of encouragement.

Nicole Holden : mwestpress@gmail.com Mike Holden : mholdendesign@yahoo.com


Thursday, December 29, 2011

Hallway

So this is one of those projects that nobody will ever notice that we did, but it was really bugging us that it was unfinished. The previous owner decided to try some "modern accent walls" which is great but not really in the small hallway with a lot of corners in a historic bungalow. So, it the result was that it looked like they just forgot to paint a few walls.

Anyhow, this whole project started when I decided to repaint the inside of our hallway cabinet / pantry, which needed some tlc after years of use. Since I had the correct color out, it snowballed into painting the rest of the lower hallway which then lead me up the stairs since we wanted to paint that area the same color as well. It wound up taking almost the whole day to "paint the pantry" but we ended up with a much more cohesive hallway.

Tuesday, December 27, 2011

One Man's Trash...

Is another man's wife's makeup vanity. So, we'd been looking for a cabinet to modify into a makeup vanity for the master bath for a while. I was sort of starting to think that I was just going to have to make something from scratch. I knew I could build something from scratch, but didn't really want to spend the time that I knew it would take to do it right. Let's face it, I'm not a cabinet maker. (Though I've found that I am a pretty good cabinet modifier.)

Anyhow, just as I was ready to start planning a custom cabinet, this little stack of drawers (minus the top drawer) showed up in the ally. The house on the corner just sold and apparently the basement was stuffed with junk that the new owner wanted to get rid of. I know this was in the basement because it smelled like a damp basement, I mean really smelled. So, I threw this smelly thing into the back of the van and got to work measuring. The smell has since abated.


I wound up cutting part of the top drawer section off, both because it was missing the drawer, and because I wanted to achieve a lower overall height. Next, I cut the back 4" off to achieve the proper depth.  After doing this, I had to reinforce the whole back since I had cut out so much of the structure of the cabinet.

Plans this week are to strip the whole thing and get a few coats of shellac on it over the long weekend. The pictures below show the whole thing mocked up to check how everything fits. When it's finished, the baseboard will continue around the bottom of the cabinet and the top will be white marble (another salvage yard purchase, though I have to have the marble cut to the right size and have the edge finished) The Drawers are a little wider than I would have made them if I had started from scratch, but there's still room to fit a small vanity-bench to the left of the drawers if you were to slide it in length-wise.

In the end, I know this will look better than something I could have built with so little time and money invested. Under all of that paint is a really well made, solid oak cabinet with dove-tail drawers. It's probably as old or older than our 82 year old house and should look right at home. I can't wait to start stripping it...  

Wednesday, December 14, 2011

Period-Correct Faucet is "Correct"


While flipping through a book I got from the library last night, I came across a period illustration of the faucet I just restored. The book, The Vintage House Book, dates the ad to 1931, one year after our house was built. So when selecting the sink and faucet, I chose the correctly-dated faucet within a year. Not bad if I do say so myself.

Tuesday, December 13, 2011

Main Floor Bathroom Restoration

Well, it took longer than expected (of course), but the main floor bath is complete. The centerpiece is our restored 1920's Kohler sink with original Kohler faucet and legs - very appropriate for a Wisconsin Bungalow. I found it at the salvage yard a few months back and was interested in buying just the faucet. When I asked about it, I was told that I could have the sink, faucet and legs for $40! So, I took the whole thing home and had to convince Nicole why I thought it was a good idea to restore a 80+ year old sink. She caved and told me the cost of the restoration would be part of my Christmas present. So, Merry Christmas to to me!


The restoration of the sink entailed removing the faucet, valves, drain, etc. to have the basin reglazed. In doing so, I sheared the end off of a threaded rod, essentially destroying a key component of the faucet. I thought I was going to have to cut my losses and buy a "modern" faucet, but figured I'd at least try to locate the part. After some searching on the interwebs, I found a place in the suburbs that specializes in plumbing supply.

When I went in and explained what I was trying to do, they gave me a hard time (in a friendly kind of way) telling me that they sell new faucets, but humored me and pulled out a really old, dusty book of Kohler parts diagrams and looked up the part. They soon found that they actually had four in stock (despite the part being discontinued). They also located all of the seals and other wear items that I would need to put it back together.


Other components of the bathroom restoration:

Skim coated / repainted all of the plaster walls
Installed a reproduction 1930's porcelain light from Rejuvination
Installed a 1930's vintage glass towel bar from the Detroit Antique Mall
Installed a nickel plated shower rod from Restoration Hardware
Stripped the paint off of the door (we still have to polyurethane it in the spring)
Cleaned, stripped and polished all of the various hinges and hardware in the bathroom
Replaced the modern light switch with a vintage original (salvaged from the old garage before it was torn down)


All told, it took a little over a month and was aggrevating having the house torn apart again so soon after the (almost) completion of the master bedroom, but we're thrilled with the results. Here's a quick mash-up of before and after:


Monday, December 12, 2011

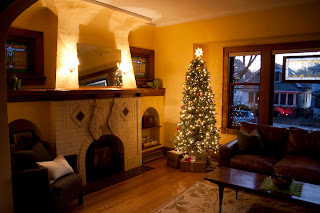
First Christmas Tree

So, it's not our first Christmas tree, it's actually the same Christmas tree we bought a few years ago for our tiny apartment in Chicago. But it looks so much better in our new home, I think it probably feels better too not being blasted by a radiator. Anyhow, MERRY CHRISTMAS!


(This post is our Christmas Card this year since we've already had our share of addressing envelopes in recent months...) 

And Bathroom

Having a new bathroom has been one of the best parts of the renovation. It was also one of the hardest DIY projects to handle. The hexagonal tiles we chose, although period correct and now very beautiful, were a low point of my life to say the least. I had no idea that a material object could cause me so much anger and frustration, but I was not defeated and now the bathroom is exactly what we wanted. Although the make-up vanity for the corner is still on the to-do list, we are happy to be enjoying our new en-suite bathroom.


A Complete Master Bedroom

Through this renovation process, we have found that a job never really seems to come to an end, so you have to find a way to just be happy with where things are currently. Currently we are very, very happy to finally not only just have a functional Master Suite, but a gorgeous one that we designed ourselves. From tearing down the walls to hanging the chandelier I convinced Mike was an absolute necessity.

Here's a few pics of the room in it's current state. We still have a few odds and ends to wrap up, but it's so nice to have a cozy attic bedroom "finished" for the winter months ahead.


As we post more on the Blog, we plan to go back through our renovation pictures of the bedroom to document a little more of how we got from the "before" to the "after", so stay tuned.

Wednesday, December 7, 2011

Details

While we still have a lot of work to do on the inside of the house before it's "done", we've begun to focus on some of the smaller projects that we've been meaning to get around to. The milk chute has been on that list for a while, as we plan to use it as a place for keys since it's next to the door.


I stripped the inside when we first moved in, while I was in my "looking for something to do" stage of new homeownership, (before we had any concrete plans for the upstairs renovation). Nicole spent part of Saturday finishing what I started by painting the inside and creating a custom stencil.


Apart from the fact that it's a cool detail, Nicole also did the stencil as a dry run for our plans to create some sort of Art Deco inspired border stencil for the cetral hall and stairwell.

There's more to come now that we're not undergoing a major renovation and planning a wedding. We've also decided to try to make the blog a little more informational by adding a local resources section on the side. Time will tell if that's useful, as we don't have any followers here in Milwaukee, but as we update the blog  we hope to transition it into something that's a bit more informational for other Bungalow / old house owners and figured that would be a good start.